The Cart Assembler[]
The Cart Assembler is used to design and assemble your carts. It allows you to put whatever modules you would like together. For information about the Cart Assembler you can watch the video below or read the short tutorial below the video.

Getting Started[]
To start, you will first need to craft the block. To do so you will need to make 2 Simple PCBs which can then be crafted to make the Cart Assembler as seen below.
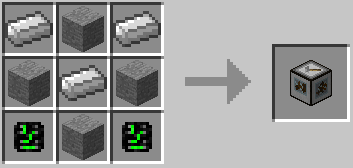
Components used in this recipe: Simple PCB
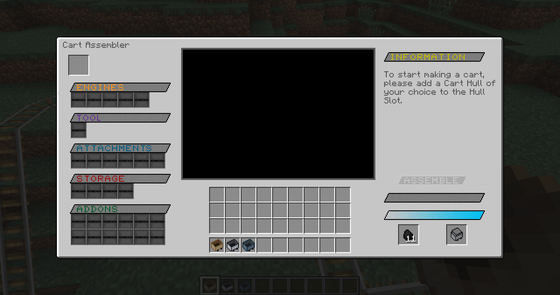
The Interface[]
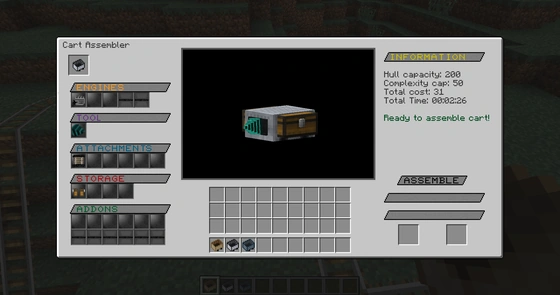
Right clicking the Cart Assembler opens the interface.
Assembly area: To the left is the assembly area. Here modules can be placed to add to a cart. When a hull is added to the hull slot, available module slots are unlocked. More advanced hulls unlock a larger amount of module slots. Adding modules to the slots will cause the preview to update.
Preview area: The center-top contains a 3D representation of the cart. The cart shown will reflect what modules have been added to the assembling area. Left click and drag it to view from a particular angle. Right click to bring up a simulation menu. From there you can select how different parts of the cart should be shown in the preview. The simulation menu is only available when modules with simulations settings are placed in the assembly area.
Information area: In the top right part of the interface is the information area. This will show the information about the cart that is currently being assembled. When a hull is added to the hull slot this area will show the hull capacity, the hull complexity cap, the total cost used, the time required to make the cart as well as any errors.
Progress area: The bottom right is the progress area. The progress area contains construction start, progress and fuel level. This is also where you can supply the cart with fuel and retrieve the finished cart.
Inventory area: The bottom-middle contains the player's inventory.
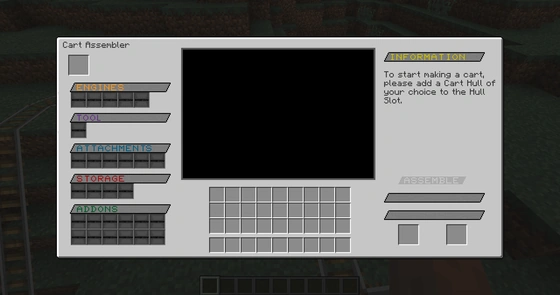
Adding a hull[]
There are several different hulls you can add. They all work the same but are basically different tiers of hulls. Choose the hull you would like to use and put it in the very top left most slot. Depending on the type of hull you used, a certain amount of module slots will open in each category.
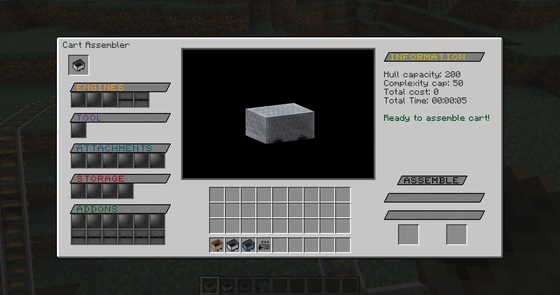
To the right you can see that the information panel has been changed. This part is important if you want to control the assembling process. To understand their function, you need to know that all modules have their own modular cost. This is basically how expensive a module is to be added to a cart; more advanced modules have a higher modular cost. Modular costs controls what modules you can add to different hulls as well as the time to construct the cart, as you can see below.
Hull Capacity: The maximum sum of all the modular costs that can fit into the hull.
Complexity Cap:
The maximum modular cost a module can have and still fit in the hull.
Total Cost:
The sum of all the modular cost of all the modules added to the cart. If this is greater than the Hull Capacity, the cart can't be created.
Total Time:
The time it will take to create the cart. This is calculated from the modular cost of each module added.
Designing Your Cart[]
Now that you have the hull in place, you may begin placing the modules you want. Each module has a category (either an Engine, Tool, Attatchment, Storage, or Addon), and the module will only fit in that category. If you're not sure which category a module goes into, shift click it and it'll be added automatically.
Some modules also occupy one or more sides of the cart. Once a side is taken up, you can't add any modules that also require that side. You can see which sides a module takes up by holding shift and mousing over the module.
Time to Assemble[]
Once you have designed your cart, you can assemble it. Keep in mind that it will not assemble if there's an error (like if your modules exceed the hull capacity, or if two modules take up the same side).
To assemble the cart, you will first need to supply the cart assembler with fuel (coal, charcoal, etc.). Put the fuel in the left slot in the Progress area. This will fill up the bottom bar, which indicates the fuel level.
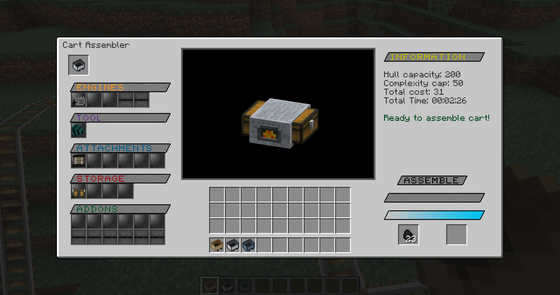
Once you have enough fuel, click the assemble button. This will empty the Assembling area, the Preview area and the Information area. The progress bar will increase as your cart is assembled, while the fuel bar slowly decreases. If the assembler runs out of fuel, it will pause and wait until it receives more fuel.
Keep in mind that carts often take ten or twenty minutes to assemble. However, if you are in creative mode, you can get an item called the Creative Upgrade, which lets your carts get assembled instantly, without using any fuel. To use this item, hold shift and right-click the cart assembler.
The world of carts[]
When the progress bar is fully filled the finished cart will be added to the very bottom-right slot. Pick it up and use it as you want. You have now made your very first modular cart.